Showing posts with label Sitecore. Show all posts

Monday, July 18, 2016

Setup Angular 2 and Typescript in Sitecore Project


It is detailed instruction on how to setup Angular 2 and Typescript in existing Sitecore project. For this purposes I’ve created a simple Sitecore solution, you can download it from here https://github.com/kosty78/SimpleSc and setup Angular 2 by following my instructions. The solution has TDS and Web projects with simple layout and test control.


Also I’ve checked in solution with configured Angular 2, so you can download it, restore all packages and run https://github.com/kosty78/SimpleScWithAngular2

My Environment:
  • VS 2015 Update 3
  • Sitecore 8.1
  • NodeJS 6.3 https://nodejs.org/en/

First of all, please install the ‘Package Installer’ it will help us to manage JS packages:


·        


     Right click on the Project(SimpleSc.Web) and chose ‘Quick Install package’


Enter ‘angular2’ and click ‘Install’
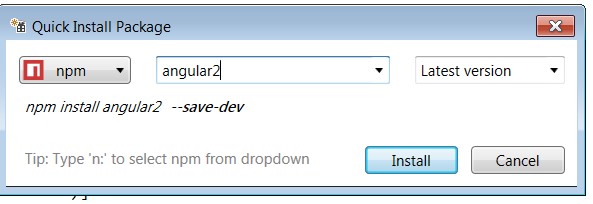
Use the Quick Installer again and install

  • rxjs
  • es6-shim
  • es6-promise
  • gulp
  • systemjs


Make all folders visible and you will see new folder in the project – ‘node_modules’


Now we need to setup the Typescript - add new folder ‘ts’ and 2 typescript files: boot and component

Add Typescript json configuration file and replace the text:


{
  "compilerOptions": {
    "emitDecoratorMetadata": true,
    "experimentalDecorators": true,
    "module": "system",
    "moduleResolution": "node",
    "noImplicitAny": false,
    "noEmitOnError": true,
    "removeComments": false,
    "target": "es5",
    "outDir": "static/scripts/js"
  },
  "compileOnSave": true,
  "watch": true,
  "exclude": [
    "node_modules",
    "wwwroot"
  ]
}


Into boot.ts add:


import {bootstrap} from 'angular2/platform/browser'
import {AppComponent} from './component'

bootstrap(AppComponent);


Into Component.ts add:


/// 
import {Component} from 'angular2/core';

@Component({
    selector: 'angular2',
    template: `{{title}}

`
})

export class AppComponent {
    title: string;

    constructor() {
        this.title = 'Angular 2';
    }
}


Now we need to copy necessary js files to our folder, add Gulp configuration file


And replace the text in the file:


var gulp = require('gulp');

gulp.task('copy:libs', function () {
    return gulp.src([
        'node_modules/es6-shim/es6-shim.min.js',
        'node_modules/systemjs/dist/system-polyfills.js',
        'node_modules/systemjs/dist/system.src.js'
    ]).pipe(gulp.dest('static/scripts/vendor/ang'))
});

gulp.task('copy:rx', function () {
    return gulp.src([

        'node_modules/rxjs/**/*.js'

    ]).pipe(gulp.dest('static/scripts/vendor/ang/rxjs'))
})

gulp.task('copy:angular', function () {
    return gulp.src([
        'node_modules/angular2/**/*.js',
    ]).pipe(gulp.dest('static/scripts/vendor/ang/angular2'))
});

gulp.task('copy:symbol-observable', function () {
    return gulp.src([
        'node_modules/symbol-observable/**/*.js',
    ]).pipe(gulp.dest('static/scripts/vendor/ang/symbol-observable'))
});


gulp.task("copy", ["copy:libs", 'copy:rx', 'copy:angular', 'copy:symbol-observable']);


Go to the task runner and start the copy task


Now we need to configure system.js, create new javascript file setup.systemjs.js in static/script/js/ and add the text below into the file:


System.config({
 defaultJSExtension: true,
 map: {
  app: 'static/scripts/js',
  rxjs: 'static/scripts/vendor/ang/rxjs',
  angular2: 'static/scripts/vendor/ang/angular2',
  'symbol-observable': 'static/scripts/vendor/ang/symbol-observable'
 },
 packages: {
  app: {
   defaultExtension: 'js',
   format: 'register'
  },
  rxjs: {
   defaultExtension: 'js',
   format: 'cjs'
  }
  ,
  angular2: {
   defaultExtension: 'js',
   format: 'cjs'
  },
  'symbol-observable':
   {
    defaultExtension: 'js',
    main: 'index.js'
   }
 }
});

System.import('app/boot').then(null, console.error.bind(console));


Now we need to add the references in the Layout file : SimpleLayout.cshtml


    <script src="static/scripts/vendor/ang/es6-shim.min.js" type="text"></script>
    <script src="static/scripts/vendor/ang/system-polyfills.js"></script>


    <script src="static/scripts/vendor/ang/angular2/bundles/angular2-polyfills.js"></script>
    <script src="static/scripts/vendor/ang/system.src.js"></script>
    <script src="static/scripts/vendor/ang/rxjs/Rx.js"></script>
    <script src="static/scripts/vendor/ang/angular2/bundles/angular2.dev.js"></script>
    <script src="static/scripts/js/setup.systemjs.js"></script>


Add post build event to copy necessary angular2 files into sitecore web directory
xcopy "$(ProjectDir)Static\scripts\vendor\ang" "c:\Sitecore\Sites\sc8\Website\Static\scripts\vendor\ang" /i /e /y


Now rebuild and run the Sitecore and preview the Test page


Wow, it Works!!! Now you can research Angular 2 features! )

Monday, September 14, 2015

Sitecore, ADAM, Basic API Example

My project uses Sitecore as a Front-End and ADAM as a Photo-Storage, the task is - display a list of specific records(Name, Description and Picture). Because ADAM's documentation is hard to find, I'm going to provide the code :)
First of all we need to create a Template, that will have just one TextFiled with the Record Guids that we need to display.
Now we need to get those records from ADAM:

            var app = new Application();
            if (app.LogOn(Configuration.Settings.Registration, Configuration.Settings.AdamName, Configuration.Settings.AdminPassword) == LogOnStatus.LoggedOn)
            {
                try
                {
                    foreach (var assetId in AssetList.Records.Split(','))
                    {
                        var record = new Record(app);
                        record.Load(new Guid(assetId));
                        Records.Add(record.Files.Master.GetPreview().GetPath(), record.Fields["Name"]);
                    }

                }
                finally
                {
                    app.LogOff();
                }
            }


And just display it in a View:

@{
    if (!Model.Records.Any())
    {
        [No content found. Verify data service is available.]
        return;
    }
}

<ul class="record-list">
        @foreach (var item in Model.Records)
        {
          <li> <img href="@item.Key"></img> </li>
          <li> @item.Value </li>
        }

</ul>


That is it!  Looks very easy! ADAM and Sitecore now are partners and there is a plugin 'ADAM CONNECTOR' in the Sitecore Marketplace. I'm going to research this plugin and probably my next post will be about the plugin.

Thursday, June 11, 2015

Sitecore and GlassMapper - how much a GlassCast<> costs

We are using the GlassMapper on many projects, I just want to know how it affects performance.
I have about 20000 Items for testing (Articles) with about 20 fields, in first code I use the GlassCast to get Titles:


items.Select(item => item.GlassCast<Article>()).Select(art => art.Title).ToList();


In second part I will use the field directly:


items.Select(item => item[Article.TitleFieldName]).ToList();


In first case, when we use the GlassCast average time was 00:00:55.23 In second case average time was 00:00:00.034

It's almost 2000 times faster, so we should use it carefully!

Friday, June 5, 2015

Starting with Sitecore Analytics MongoDB API


I see a lot of questions about how to start using it, so this is a short post about.
For example let's get all Visits data for the last month (last 30 days) for our particular site. First of all we need to get the MongoDB collection named "Interactions" it has all Visits data:

//Connecting to the Analytics DB
var driver = Sitecore.Analytics.Data.DataAccess.MongoDb.MongoDbDriver.FromConnectionString("analytics");

//Building our query
var builder = new QueryBuilder();
var filter = builder.And(builder.GTE(_ => _.StartDateTime, DateTime.Now.AddDays(-30)), builder.EQ(_ => _.SiteName, siteName.ToLower())); 

//Retrieving data from the "Interactions" collection
var interactions = driver.Interactions.FindAs(filter)


In similar way you can get other data.

That is it! 

Friday, May 15, 2015

Resolving old legacy URL’s with Sitecore

This summary is not available. Please click here to view the post.

Sitecore Query in the MVC Rendering Datasource


I found many articles about resolving queries for the ASP.NET Webforms and nothing for the MVC. Sitecore doesn't support it OOTB, so I decide to write this small post.
First of all we need to create a new processor in the Sitecore pipeline:

using Sitecore.Data.Items;
using Sitecore.Mvc.Pipelines.Response.RenderRendering;
namespace CustomSolution.Common.Pipelines
{
    public class RenderingDatasourceQueryResolver : RenderRenderingProcessor
    {
        public override void Process(RenderRenderingArgs args)
        {
            string dataSource = args.Rendering.DataSource;
            if (!dataSource.StartsWith("query:")) return;
            Item queryItem = args.PageContext.Item.Axes.SelectSingleItem(dataSource.Substring(6));
            if (queryItem != null)
            {
                args.Rendering.DataSource = queryItem.Paths.FullPath;
            }
        }
    }
}


Now we needs to register the Processor:

  <sitecore>  
   <pipelines>  
    <mvc.renderRendering>  
     <processor patch:before="*[@type='Sitecore.Mvc.Pipelines.Response.RenderRendering.ExecuteRenderer, Sitecore.Mvc']"  
       type="CustomSolution.Common.Pipelines.RenderingDatasourceQueryResolver, CustomSolution"/>  
    </mvc.renderRendering>  
   </pipelines>  
  </sitecore>  


Now we can use a Sitecore query, for example to get the Site:
query:./ancestor-or-self::*[@@templatename='Site']


That is it! 

Friday, April 24, 2015

Sitecore SPEAK Upload Media Dialog doesn't Upload any files

It looks like that the image had been uploaded but it never finished. First of all I've found an exception in the Sitecore:

 No component for supporting the service Sitecore.Controllers.MediaController was found

It was fixed by registering the component in the code:


container.Register(Component.For(typeof(Sitecore.Controllers.MediaController))
                    .LifestylePerWebRequest());

But unfortunately it didn't help me (: That is mean my current Sitecore should be updated, Sitecore CMS 7.5 rev. 141003 Hotfix 431794-1 should fix it. But if we can't do any updates for some reason, we can switch to the old style Upload dialog.
Just go to  /App_Config/Include/Sitecore.Speak.Applications.config file and comment out the following line:

<overrideXmlControls>
   <override xmlControl="Sitecore.Shell.Applications.Media.MediaBrowser" 
          with="/sitecore/client/applications/Dialogs/SelectMediaDialog" />
</overrideXmlControls>


That is it! 

Tuesday, April 14, 2015

Injecting javascript and css to Sitecore Content Editor Page


Sometimes we need to use javascript in our custom fields, to do that we should inject them into Content Editor Page: 


    public class InjectScripts
    {
        public void Process(PipelineArgs args)
        {
            if (Sitecore.Context.ClientPage.IsEvent) return;

            HttpContext current = HttpContext.Current;
            if (current == null) return;

            Page page = current.Handler as Page;
            if (page == null) return;

            string[] strArray = {
               "/sitecore/shell/Controls/Lib/Scriptaculous/Scriptaculous.js",
               "/sitecore/shell/Controls/Lib/Scriptaculous/builder.js",
               "/sitecore/shell/Controls/Lib/Scriptaculous/effects.js",
               "/sitecore/shell/Controls/Lib/Scriptaculous/dragdrop.js",
               "/sitecore/shell/Controls/Lib/Scriptaculous/slider.js",
               "/sitecore/shell/Controls/CustomControls/CustomField/custom.js"
                                };
            foreach (string str in strArray) page.Header.Controls.Add(new LiteralControl(string.Format("", str)));
            
            page.Header.Controls.Add(new LiteralControl(""));
        }
    }

And in config file:


<configuration xmlns:patch="http://www.sitecore.net/xmlconfig/">
  <sitecore>
    <pipelines>
      <rendercontenteditor>
        <processor patch:before="*[1]" type="CustomField.InjectScripts, CustomField">
      </processor>
     </rendercontenteditor>
    </pipelines>
  </sitecore>
</configuration>


Very Easy!