Wednesday, August 9, 2023

Building Microservices Architecture: 10 Essential Principles


Microservices architecture has become a prominent pattern in modern software development. It offers an efficient way to build applications as a suite of small, independent, and loosely coupled services. By focusing on a specific functionality and communicating through well-defined interfaces, microservices enable agility, scalability, and resilience.

However, designing a microservices architecture can be complex, and it demands a clear understanding of its principles and practices. Without proper design and implementation, you might encounter issues related to maintenance, scalability, or performance. In this article, we will explore the 10 essential principles that you should consider when building a microservices architecture:


  1. Decomposing Into Single Responsibilities: Each microservice should be responsible for a single functionality or business capability. This isolation of responsibilities allows for easier development, deployment, and scaling.
  2. Independent Deployment & Scalability: Microservices should be able to be deployed, updated, and scaled independently of one another. This provides flexibility and can lead to better resource utilization.
  3. API Design & Contract: The APIs for each microservice should be carefully designed, and the contract must be well-defined. This allows different services to interact with each other in a consistent and predictable manner.
  4. Data Isolation: Each microservice should own its data and have full control over it. Sharing databases across services can create tight coupling and lead to difficulties in scaling and maintaining the system.
  5. Service Discovery: With many small services, it's essential to have a mechanism for discovering and communicating with those services. Service discovery tools can automate this process.
  6. Monitoring & Logging: Robust monitoring and logging are critical for understanding the behavior of an application and for diagnosing problems. Centralized logging can help in correlating events across different services.
  7. Security & Authentication: Security measures should be implemented to restrict access to each microservice. Tokens, API keys, or OAuth are common methods to ensure secure communication between services.
  8. Fault Tolerance & Resilience: Implementing strategies for handling failure is crucial. This includes timeouts, retries, circuit breakers, and other mechanisms to ensure that the failure in one service does not bring down the entire system.
  9. Network Latency & Communication: Understanding and optimizing the communication between microservices is essential. Choosing the right communication protocol (HTTP/REST, gRPC, etc.) and managing network latency can have a significant impact on performance.
  10. Testing Strategies: Testing microservices can be complex due to their distributed nature. Strategies should include unit testing, integration testing, and end-to-end testing to ensure that the services are performing as expected both individually and together.

Friday, April 14, 2023

Pros and Cons of Composable Services for Enterprise


Introduction:

In a continuously evolving digital landscape, companies are seeking methods to enhance efficiency, drive innovation, and maintain their agility. One such tactic is the adoption of composable services, which allows organizations to construct applications by piecing together modular and reusable building blocks. This post will discuss the various advantages and disadvantages of implementing composable services within enterprise environments.

Pros:

1. Faster Time-to-Market: Utilizing reusable components allows enterprises to significantly cut down the time and labor needed for application development. As a result, they can bring new products and services to market more quickly, giving them a crucial competitive edge.

2. Financial Savings: Composable services can lead to significant cost savings by reducing development time, minimizing the need for custom code, and promoting resource sharing. Additionally, by utilizing cloud-native services, enterprises can further optimize their infrastructure costs.

3. Flexibility and Scalability: Composable services enable enterprises to easily adapt to changing business requirements, scale up or down as needed, and quickly incorporate new features. This flexibility allows organizations to stay competitive in an ever-changing business landscape.

4. Improved Collaboration and Innovation: The modular nature of composable services encourages collaboration among different teams within an organization, as they can easily share and reuse components. This inter-team cooperation can boost innovation, motivating teams to experiment with fresh ideas and methodologies.

Cons:

1. Integration Hurdles: As companies incorporate multiple services, the complexity of managing and integrating these components can rise. This could potentially lead to lengthier development cycles and heightened maintenance demands, undermining some of the benefits gained from composable services.

2. Security and Compliance Risks: Utilizing multiple services, each with unique policies and security measures, may pose difficulties for enterprises in maintaining consistent security and compliance standards across their applications. This could increase the likelihood of data breaches and penalties related to non-compliance.

3. Vendor Lock-In: Dependence on proprietary services or specific cloud providers can result in vendor lock-in, hindering organizations from switching vendors or embracing multi-cloud approaches. This can limit an enterprise's capacity to utilize the most suitable solutions in the market.

4. Skill Set Requirements: The implementation of composable services necessitates a specialized skill set, particularly in fields such as microservices, containerization, and cloud-native technologies. Organizations might have to invest in employee training or recruit new talent to ensure the successful adoption of composable services.

Conclusion: 

Composable services offer a range of benefits for enterprises, including versatility, expandability, and financial savings. However, organizations must also consider potential challenges like integration hurdles, security risks, and specialized knowledge requirements. By carefully evaluating these pros and cons, enterprises can make well-rounded decisions about whether to adopt composable services and how to best apply them in their specific situations.


Thursday, April 13, 2023

Using PowerShell to Change Sitecore SXA Rendering Variants

Recently, while working on a POC for a client, I faced a challenge to change SXA variants for renderings in bulk. 

As a solution, I decided to create a PowerShell script for it.

Although I hadn't performed this particular task in the past and I couldn't find the exact field that needs to be change on Google or on ChatGPT. 

Therefore, I conducted quick research and created a script that can be useful for others as well.


The below PowerShell script can be used to change a variant for a rendering in Sitecore.

Lets get it indexed in serch engines :)


$renderingFolder = Get-Item -Path "master:/sitecore/layout/Renderings/Feature/YourProjectFolder"
$renderingVariantsFolder = Get-Item -Path "master:/sitecore/content/YourProjectFolder/YourProjectFolder/Presentation/Rendering Variants"
$defaultLayout = Get-LayoutDevice -Default

$itemPath = "/sitecore/content/NTTDataAmerica/NTTDataAmerica/Home/YourPage"
$renderingName = "Your rendering name"
$variantName = "Your variant to apply"

# Get the page item
$item = Get-Item -Path $itemPath 

# Find the item with the specified rendering name
$rendering = Get-ChildItem -Path $renderingFolder.FullPath -Recurse | Where-Object { $_.Name -eq $renderingName }
$renderingInstances = Get-Rendering -Item $item -Rendering $rendering -Device $defaultLayout -FinalLayout

# Find the item with the specified variant name	
$renderingVariants = Get-ChildItem -Path $renderingVariantsFolder.FullPath -Recurse | Where-Object { $_.Name -eq $renderingName }
$newVarient = Get-ChildItem -Path $renderingVariants.FullPath -Recurse | Where-Object { $_.Name -eq $variantName }

#there can be more then 1 rendering on a page
foreach ($renderingInstance in $renderingInstances) {

    #rendering Variants stored in "FieldNames"
	$renderingParameters = [ordered]@{"FieldNames"=$newVarient.ID}
		
	# Save the changes to the rendering instance
	Set-Rendering -Item $item -Instance $renderingInstance -Parameter $renderingParameters -FinalLayout
		
}


Thursday, April 4, 2019

Sitecore Pattern Cards and third party Service Integration


The Sitecore’s profiles, rules and pattern cards are very powerful personalization mechanism. On my current project, I had a requirement to integrate OOB personalization and a third party service that is responsible for a user personalization metrics.
When the user visit the page, we need to call an API, get the metrics and personalize the page’s look and feel. For example let’s say the metrics we get - are the distribution lists that the user belongs to, for example:

{
'user' : 'user name',
'data' : ['managers@somecompany.com','employee@somecompany.com',
'usa@somecompany.com']
}


The customer wants to display diff content for USA managers, USA employees and employees from Europe.
Let’s start from creating a Profile named “Audience” and necessary Profile Keys at /sitecore/system/Marketing Control Panel/Profiles:


Set the Max Value to 1 for all items, now let’s create 3 Pattern cards:


Let’s apply all those cards to our personalizable components, we just need to create few simple rules:


The Last step - now  when somebody visits the page, we need to get the metrics from the third party API and apply it to the Visit(we don’t care about previous visits) and Sitecore then can find the appropriate Pattern Card itself.

Register a Processor for it:


<configuration xmlns:patch="http://www.sitecore.net/xmlconfig/">
  <sitecore>
    <pipelines>
      <processitem>
        <processor patch:after="processor[@type='Sitecore.Analytics.Pipelines.CreateVisits.InitializeProfile, Sitecore.Analytics']" type="SomeNamespace.AudienceProfileProcessor, LibraryName">
      </processor></processitem>
    </pipelines>
  </sitecore>
</configuration>


And the processor code:


using System;
using System.Collections.Generic;
using System.Linq;
using System.Net.Http;
using System.Net.Http.Headers;
using System.Web;
using Sitecore.Analytics;
using Sitecore.Analytics.Model;
using Sitecore.Analytics.Pipelines.ProcessItem;

namespace SomeNamespace
{
    public class AudienceProfileProcessor : ProcessItemProcessor
    {
        public override void Process(ProcessItemArgs args)
        {
            var profileName = "Audience";
            string name = GetCurrentUserName(); //Get current visitor name

            User user = GetAudienceData(name); //Call third party API for metrics
            if (!user.Data.Any())
            {
                return;
            }

            var profileKeys = GetProfileKeysFromDL(user.Data);

            if (Tracker.Current.Interaction.Profiles.ContainsProfile(profileName))
            {
                Tracker.Current.Interaction.Profiles.Remove(profileName);
            }

            List listOfProfileData = new List
            {
                new ProfileData(profileName)
            };
            Tracker.Current.Interaction.Profiles.Initialize(listOfProfileData);
           //Apply our metrics
            var profile = Tracker.Current.Interaction.Profiles[profileName];
            profile.Score(profileKeys);
            profile.UpdatePattern();
        }
}


That is it, now Users will see only appropriate content!

Wednesday, August 9, 2017

Sitecore and React – simple integration

I’ve just developed simple application that allow using Sitecore Fields and Data in native React Application with all benefits of Expirience Editor. You can download the source code here https://github.com/kosty78/SitecoreReact.git

Example of usage:

1) In your Rendering View cshtml file use SitecoreReact helper to register fields and data that you are going to use, in my example: Title, Product Description and some List of data:


2) In react Application add SitecoreReact.js file from js folder and do
 $ npm install html-react-parser

3) Now you can use Field and Data components in you react Application:


It works in Expirience Editor too:

Wednesday, January 25, 2017

Sitecore SXA Field Helpers

While exploring OTB SXA Components, I found that those components mostly use the standard Sitecore helpers for rendering. But what about SXA-specific MVC helpers. What do they do?
This is based on Sitecore 8.2 Initial Release Sitecore Experience Accelerator

@Html.Sxa().Field()
I have put 2 fields into the page:

<h1>@Html.Sxa().Field("ButtonTitle",Model.DataSourceItem, false)</h1>
<h1>@Html.Sitecore().Field("ButtonTitle", Model.DataSourceItem)</h1>
They render absolutely the same content:

<h1>
<span class="scChromeData">{Sitecore stuff }</span>
<span id="fld_A55E26E1CE4C4927AEECA0BF6203AFF8_BDC182F2926B43B099D78135AD5DA64B_en_1_78d82c00c05d46e7a1a6f3f6e25cc290_111_edit" sc_parameters="prevent-line-break=true" contenteditable="true" class="scWebEditInput scEnabledChrome" scfieldtype="single-line text" scdefaulttext="[No text in field]" sc-part-of="field">
Test1 Button title
</span>
</h1>
If we go to the code of the SXA method:
public IHtmlString Field(string fieldName, Item item, object parameters)
{
   return (IHtmlString) new SitecoreHelper(this._htmlHelper).Field(fieldName, item, parameters);
}
We can see that almost all SXA methods reuse regular Sitecore methods without any changes.
Also if we open the SXA OTB controls, that we can see usage of both SXA and Sitecore extension helpers and the only difference is a new SXA helper:

public IHtmlString Field(string fieldName, Item item, bool disableWebEditing)
Witch is the same as:
@Html.Sitecore().Field("TestImage", Model.DataSourceItem, new { DisableWebEdit = true })
We can use those methods to disable web editing for the fields.
@Html.RenderingVariants().RenderVariant(variantField, Model.Item, Model.IsControlEditable) 
This helper is using to render a particular variant that you can specify in the component properties:

@foreach (var variantField in Model.VariantFields)
 {
   @Html.RenderingVariants().RenderVariant(variantField, Model.Item, Model.IsControlEditable);
 }
@Html.Sxa().Placeholder("head") 
It replaces the sitecore placeholder to empty space, the only place it used in OTB components - SxaLayout.cshtml, I assume that the sxa engine use it as a metadata placeholder, more investigation needs to be done.
To be continued...

Wednesday, October 5, 2016

Sitecore 8.2 Dictionary Fallback

An important topic while working with Sitecore is how to handle different languages for the websites.

For example, we have a website that supports the English and Russian versions, all labels are stored in a local dictionary, also we have a global fallback dictionary that has just English version, so if there are no items in the local dictionary in Russian we going to use the Global Dictionary and render English labels.


First of all, we need to add Russian language and set the “Fallback Language” field in the language definitions.


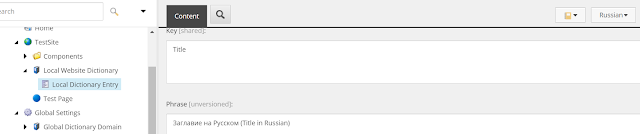
Now we need to create a Global Domain item (/sitecore/templates/System/Dictionary/Dictionary Domain) and a Global Dictionary Entry(/sitecore/templates/System/Dictionary/Dictionary Entry). Each Dictionary Entry item has two fields: Key and Phrase.  Key is a Shared Field which means that the field is shared across all language and number versions and is not meant to be different across versions.  The Phrase field is a multiline text field and is an Unversioned Field, meaning it can differ across language versions.
Do the same for our local dictionary, but set the ‘Fallback Domain’ field to the Global Dictionary Domain


And create a Russian version of the Dictionary Entry:

Now we need to configure the Sitecore to use the Local Dictionary:


<?xml version="1.0"?>

<configuration xmlns:patch="http://www.sitecore.net/xmlconfig/">

  <sitecore>

    <sites>

      <site name="website">

        <patch:attribute name="dictionaryDomain">Local Website Dictionary</patch:attribute>

      </site>

    </sites>

  </sitecore>

</configuration>

</configuration>

Below is a simple peace of code, it should show us a Title from the Local Russian dictionary and a Description from the Global English dictionary

<div>@Sitecore.Globalization.Translate.Text("Title")</div>
<div>@Sitecore.Globalization.Translate.Text("Description")</div>

It doesn’t work yet, but here is the trick: we just need to enable 2 options in the Global Dictionary Entry and the option “Enforce Version Presence” works as a trigger, so you can even clear the cache then uncheck it, save and it will work again. For me it’s a bug and probably I will do additional investigation soon.


Below is what we have now:

Monday, July 18, 2016

Setup Angular 2 and Typescript in Sitecore Project


It is detailed instruction on how to setup Angular 2 and Typescript in existing Sitecore project. For this purposes I’ve created a simple Sitecore solution, you can download it from here https://github.com/kosty78/SimpleSc and setup Angular 2 by following my instructions. The solution has TDS and Web projects with simple layout and test control.


Also I’ve checked in solution with configured Angular 2, so you can download it, restore all packages and run https://github.com/kosty78/SimpleScWithAngular2

My Environment:
  • VS 2015 Update 3
  • Sitecore 8.1
  • NodeJS 6.3 https://nodejs.org/en/

First of all, please install the ‘Package Installer’ it will help us to manage JS packages:


·        


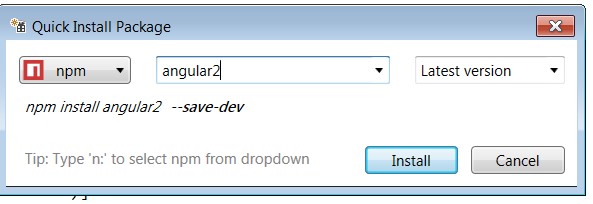
     Right click on the Project(SimpleSc.Web) and chose ‘Quick Install package’


Enter ‘angular2’ and click ‘Install’

Use the Quick Installer again and install

  • rxjs
  • es6-shim
  • es6-promise
  • gulp
  • systemjs


Make all folders visible and you will see new folder in the project – ‘node_modules’


Now we need to setup the Typescript - add new folder ‘ts’ and 2 typescript files: boot and component

Add Typescript json configuration file and replace the text:


{
  "compilerOptions": {
    "emitDecoratorMetadata": true,
    "experimentalDecorators": true,
    "module": "system",
    "moduleResolution": "node",
    "noImplicitAny": false,
    "noEmitOnError": true,
    "removeComments": false,
    "target": "es5",
    "outDir": "static/scripts/js"
  },
  "compileOnSave": true,
  "watch": true,
  "exclude": [
    "node_modules",
    "wwwroot"
  ]
}


Into boot.ts add:


import {bootstrap} from 'angular2/platform/browser'
import {AppComponent} from './component'

bootstrap(AppComponent);


Into Component.ts add:


/// 
import {Component} from 'angular2/core';

@Component({
    selector: 'angular2',
    template: `{{title}}

`
})

export class AppComponent {
    title: string;

    constructor() {
        this.title = 'Angular 2';
    }
}


Now we need to copy necessary js files to our folder, add Gulp configuration file


And replace the text in the file:


var gulp = require('gulp');

gulp.task('copy:libs', function () {
    return gulp.src([
        'node_modules/es6-shim/es6-shim.min.js',
        'node_modules/systemjs/dist/system-polyfills.js',
        'node_modules/systemjs/dist/system.src.js'
    ]).pipe(gulp.dest('static/scripts/vendor/ang'))
});

gulp.task('copy:rx', function () {
    return gulp.src([

        'node_modules/rxjs/**/*.js'

    ]).pipe(gulp.dest('static/scripts/vendor/ang/rxjs'))
})

gulp.task('copy:angular', function () {
    return gulp.src([
        'node_modules/angular2/**/*.js',
    ]).pipe(gulp.dest('static/scripts/vendor/ang/angular2'))
});

gulp.task('copy:symbol-observable', function () {
    return gulp.src([
        'node_modules/symbol-observable/**/*.js',
    ]).pipe(gulp.dest('static/scripts/vendor/ang/symbol-observable'))
});


gulp.task("copy", ["copy:libs", 'copy:rx', 'copy:angular', 'copy:symbol-observable']);


Go to the task runner and start the copy task


Now we need to configure system.js, create new javascript file setup.systemjs.js in static/script/js/ and add the text below into the file:


System.config({
 defaultJSExtension: true,
 map: {
  app: 'static/scripts/js',
  rxjs: 'static/scripts/vendor/ang/rxjs',
  angular2: 'static/scripts/vendor/ang/angular2',
  'symbol-observable': 'static/scripts/vendor/ang/symbol-observable'
 },
 packages: {
  app: {
   defaultExtension: 'js',
   format: 'register'
  },
  rxjs: {
   defaultExtension: 'js',
   format: 'cjs'
  }
  ,
  angular2: {
   defaultExtension: 'js',
   format: 'cjs'
  },
  'symbol-observable':
   {
    defaultExtension: 'js',
    main: 'index.js'
   }
 }
});

System.import('app/boot').then(null, console.error.bind(console));


Now we need to add the references in the Layout file : SimpleLayout.cshtml


    <script src="static/scripts/vendor/ang/es6-shim.min.js" type="text"></script>
    <script src="static/scripts/vendor/ang/system-polyfills.js"></script>


    <script src="static/scripts/vendor/ang/angular2/bundles/angular2-polyfills.js"></script>
    <script src="static/scripts/vendor/ang/system.src.js"></script>
    <script src="static/scripts/vendor/ang/rxjs/Rx.js"></script>
    <script src="static/scripts/vendor/ang/angular2/bundles/angular2.dev.js"></script>
    <script src="static/scripts/js/setup.systemjs.js"></script>


Add post build event to copy necessary angular2 files into sitecore web directory
xcopy "$(ProjectDir)Static\scripts\vendor\ang" "c:\Sitecore\Sites\sc8\Website\Static\scripts\vendor\ang" /i /e /y


Now rebuild and run the Sitecore and preview the Test page


Wow, it Works!!! Now you can research Angular 2 features! )

Monday, September 14, 2015

Sitecore, ADAM, Basic API Example

My project uses Sitecore as a Front-End and ADAM as a Photo-Storage, the task is - display a list of specific records(Name, Description and Picture). Because ADAM's documentation is hard to find, I'm going to provide the code :)
First of all we need to create a Template, that will have just one TextFiled with the Record Guids that we need to display.
Now we need to get those records from ADAM:

            var app = new Application();
            if (app.LogOn(Configuration.Settings.Registration, Configuration.Settings.AdamName, Configuration.Settings.AdminPassword) == LogOnStatus.LoggedOn)
            {
                try
                {
                    foreach (var assetId in AssetList.Records.Split(','))
                    {
                        var record = new Record(app);
                        record.Load(new Guid(assetId));
                        Records.Add(record.Files.Master.GetPreview().GetPath(), record.Fields["Name"]);
                    }

                }
                finally
                {
                    app.LogOff();
                }
            }


And just display it in a View:

@{
    if (!Model.Records.Any())
    {
        [No content found. Verify data service is available.]
        return;
    }
}

<ul class="record-list">
        @foreach (var item in Model.Records)
        {
          <li> <img href="@item.Key"></img> </li>
          <li> @item.Value </li>
        }

</ul>


That is it!  Looks very easy! ADAM and Sitecore now are partners and there is a plugin 'ADAM CONNECTOR' in the Sitecore Marketplace. I'm going to research this plugin and probably my next post will be about the plugin.

Thursday, June 11, 2015

Sitecore and GlassMapper - how much a GlassCast<> costs

We are using the GlassMapper on many projects, I just want to know how it affects performance.
I have about 20000 Items for testing (Articles) with about 20 fields, in first code I use the GlassCast to get Titles:


items.Select(item => item.GlassCast<Article>()).Select(art => art.Title).ToList();


In second part I will use the field directly:


items.Select(item => item[Article.TitleFieldName]).ToList();


In first case, when we use the GlassCast average time was 00:00:55.23 In second case average time was 00:00:00.034

It's almost 2000 times faster, so we should use it carefully!

Friday, June 5, 2015

Starting with Sitecore Analytics MongoDB API


I see a lot of questions about how to start using it, so this is a short post about.
For example let's get all Visits data for the last month (last 30 days) for our particular site. First of all we need to get the MongoDB collection named "Interactions" it has all Visits data:

//Connecting to the Analytics DB
var driver = Sitecore.Analytics.Data.DataAccess.MongoDb.MongoDbDriver.FromConnectionString("analytics");

//Building our query
var builder = new QueryBuilder();
var filter = builder.And(builder.GTE(_ => _.StartDateTime, DateTime.Now.AddDays(-30)), builder.EQ(_ => _.SiteName, siteName.ToLower())); 

//Retrieving data from the "Interactions" collection
var interactions = driver.Interactions.FindAs(filter)


In similar way you can get other data.

That is it! 

Friday, May 15, 2015

Resolving old legacy URL’s with Sitecore

This summary is not available. Please click here to view the post.

Sitecore Query in the MVC Rendering Datasource


I found many articles about resolving queries for the ASP.NET Webforms and nothing for the MVC. Sitecore doesn't support it OOTB, so I decide to write this small post.
First of all we need to create a new processor in the Sitecore pipeline:

using Sitecore.Data.Items;
using Sitecore.Mvc.Pipelines.Response.RenderRendering;
namespace CustomSolution.Common.Pipelines
{
    public class RenderingDatasourceQueryResolver : RenderRenderingProcessor
    {
        public override void Process(RenderRenderingArgs args)
        {
            string dataSource = args.Rendering.DataSource;
            if (!dataSource.StartsWith("query:")) return;
            Item queryItem = args.PageContext.Item.Axes.SelectSingleItem(dataSource.Substring(6));
            if (queryItem != null)
            {
                args.Rendering.DataSource = queryItem.Paths.FullPath;
            }
        }
    }
}


Now we needs to register the Processor:

  <sitecore>  
   <pipelines>  
    <mvc.renderRendering>  
     <processor patch:before="*[@type='Sitecore.Mvc.Pipelines.Response.RenderRendering.ExecuteRenderer, Sitecore.Mvc']"  
       type="CustomSolution.Common.Pipelines.RenderingDatasourceQueryResolver, CustomSolution"/>  
    </mvc.renderRendering>  
   </pipelines>  
  </sitecore>  


Now we can use a Sitecore query, for example to get the Site:
query:./ancestor-or-self::*[@@templatename='Site']


That is it! 

Friday, April 24, 2015

Sitecore SPEAK Upload Media Dialog doesn't Upload any files

It looks like that the image had been uploaded but it never finished. First of all I've found an exception in the Sitecore:

 No component for supporting the service Sitecore.Controllers.MediaController was found

It was fixed by registering the component in the code:


container.Register(Component.For(typeof(Sitecore.Controllers.MediaController))
                    .LifestylePerWebRequest());

But unfortunately it didn't help me (: That is mean my current Sitecore should be updated, Sitecore CMS 7.5 rev. 141003 Hotfix 431794-1 should fix it. But if we can't do any updates for some reason, we can switch to the old style Upload dialog.
Just go to  /App_Config/Include/Sitecore.Speak.Applications.config file and comment out the following line:

<overrideXmlControls>
   <override xmlControl="Sitecore.Shell.Applications.Media.MediaBrowser" 
          with="/sitecore/client/applications/Dialogs/SelectMediaDialog" />
</overrideXmlControls>


That is it! 

Tuesday, April 14, 2015

Injecting javascript and css to Sitecore Content Editor Page


Sometimes we need to use javascript in our custom fields, to do that we should inject them into Content Editor Page: 


    public class InjectScripts
    {
        public void Process(PipelineArgs args)
        {
            if (Sitecore.Context.ClientPage.IsEvent) return;

            HttpContext current = HttpContext.Current;
            if (current == null) return;

            Page page = current.Handler as Page;
            if (page == null) return;

            string[] strArray = {
               "/sitecore/shell/Controls/Lib/Scriptaculous/Scriptaculous.js",
               "/sitecore/shell/Controls/Lib/Scriptaculous/builder.js",
               "/sitecore/shell/Controls/Lib/Scriptaculous/effects.js",
               "/sitecore/shell/Controls/Lib/Scriptaculous/dragdrop.js",
               "/sitecore/shell/Controls/Lib/Scriptaculous/slider.js",
               "/sitecore/shell/Controls/CustomControls/CustomField/custom.js"
                                };
            foreach (string str in strArray) page.Header.Controls.Add(new LiteralControl(string.Format("", str)));
            
            page.Header.Controls.Add(new LiteralControl(""));
        }
    }

And in config file:


<configuration xmlns:patch="http://www.sitecore.net/xmlconfig/">
  <sitecore>
    <pipelines>
      <rendercontenteditor>
        <processor patch:before="*[1]" type="CustomField.InjectScripts, CustomField">
      </processor>
     </rendercontenteditor>
    </pipelines>
  </sitecore>
</configuration>


Very Easy!